Tuesday, December 18, 2012

"Bonita" hat

This hat I gave to a friend for a baby shower, actually the same friend that I gave the little bear hat to. 

I tried taking pictures of Madelyn modeling it, but they turned out blurry and I already gave away the hat, so this is the only picture I got.


I used this pattern. It's kind of a beret style hat, not quite what I expected when I originally started the pattern, but it was cute.

Kitty hat

This hat was inspired by a hat I saw on a random little girl a couple weeks ago. I was admiring the hat, thinking it would be cute for Madelyn, so my mission became finding a similar pattern to make my own version.

I had pinned this pattern a while back, but I wanted to make a generic kitty hat, not necessarily a Hello Kitty version. Out of all the commercialized characters, Hello Kitty is one I actually like and don't mind Madelyn having things with the character on it, maybe it stems from my liking it when I was a kid.

Here is the pattern as it was supposed to be...


and here's how I changed it.


I chose to use brown instead of white, and didn't end up putting the face features on the hat. I wanted Madelyn to be the kitty, rather than a kitty plastered on her head.... 

as seen below.


 Isn't she a cute kitty?


All-in-all a fun project, and a great pattern to follow. I ended up making the ear flaps a little more off-centered than the pattern required, just to make them cover more of her ears instead of her face. 

Little bear newborn hat

This little hat was a quick project. I made it for a friend's new baby boy. It was fun to look up a boy hat pattern, since all I've made so far are hats for girls :)

I originally intended to make the hat into a monkey hat, as per the pattern found here. However, once I finished it and made the ears, I thought they looked cuter on the top, making a little bear hat instead of a monkey hat. 


This hat was so little it would not fit on Audrey's hat to model it, so Madelyn's baby had to step in to do the job. 

Saturday, December 1, 2012

Hats, hats, hats...

I've been in the hat making mood lately. They are so quick and easy to make, and there are so many cute patterns available, they are kind of addicting :)

I made the two hats in this post for my mother-in-law. I liked them so much I wanted to keep them for myself, they really turned out great. 

The first one was made from this pattern. It consists of a "cloche" style hat with a wide brim and a large, multi-colored flower. I used two strands of a worsted weight yarn instead of sport weight like the pattern called for, and used a size L crochet hook in order to reach the correct gauge.


I attached the flower with safety pins so it can be removed or switched for a different colored flower.


It's SO HARD to take good, attractive pictures of a hat (and yourself) without help. This is the best I could come up with. I got tired of trying to look "good" so I just started making weird faces.


I almost like them better :)

The second hat I made from this pattern. The pattern is called "Elegant Hat'." I REALLY liked this one, and actually tried making one for myself, but the color of yarn I used the second time was awful, and it ended up being too small, so I gave it to Madelyn. It looks pretty cute on her. 


This hat has a band that was made using reverse single crochet, something I haven't tried before, with a bow attached to the band. 

Here's another "pretty" picture.


This is a good look for me :)

Sunday, November 18, 2012

Julie the jellyfish

  I recently bought this crochet book


from Joann's. I've been having a lot of fun with it, there's a ton of cute and easy patterns. I would like to make every animal, but since I couldn't pick which one to make first, I had Madelyn look through the book and pick whichever one she would like me to make. I ended up making her a narwhal, which created a discussion and learning opportunity (for her AND me) about what a narwhal is and that they are, in fact, a real animal, not just a pretend, made-up animal like I thought they were (yes, I admit it). When I was taking pictures today of recent projects I've made, I couldn't find the narwhal, he must be hiding somewhere in Madelyn's room, so I don't have a post for him yet. 

However, after making Ned the Narwhal (yes, I named them), I made him a friend.

Meet Julie.


She likes to lounge around while waiting for Ned to get done traversing the Arctic Ocean looking for food.


Don't let that cute grin fool you, her tentacles can pack a punch!


Once I find Ned I'll make a post for him, too.

Madelyn's birthday cupcakes

With Madelyn's birthday always landing right around Thanksgiving, I wanted to make her something "fall" or "Thanksgiving" themed. She's been obsessed with cupcakes, and since I just recently got this cupcake cookbook...


I promised her I would make her some cupcakes. I made two different recipes: the Golden Vanilla Cupcake with an addition of a teaspoon of pumpkin pie spice, and the Gingerbread Cupcake. I topped them with Vegan Fluffy Buttercream Frosting.They both turned out delicious, the Gingerbread one was amazing, definitely my favorite. 

After baking, cooling, and frosting, I wanted a cute way to decorate them. I searched Pinterest and finally found this tutorial for how to make little pumpkin pie cupcake toppers out of fondant. 

Success!!


I couldn't get over how cute they were!! My mom and I had fun making them while the girls napped, it was kind of like playing with playdough. I got the recipe for the fondant here, it was VERY MESSY to make, but turned out pretty good. I had to use lots of shortening to keep things unsticky and moist, but it worked better than the last time I used fondant making Madelyn's first birthday cake, which kind of turned into a cake wreck. 

Madelyn was pretty excited to see them after they were made and all the kids had fun eating them at her birthday party. She really liked her "pumpkin pie cupcakes" or "cupcake pumpkin pies." She couldn't decide which one they were :)

An afghan for our living room

Finally got around to making an afghan to go in our living room. This is actually the second full-sized afghan I've made. I made one for my sister but forgot to take a picture of it (but still need to). 

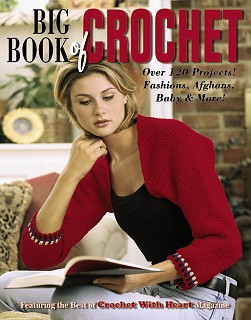
The pattern came out of the book (pictured below) that I got as a Christmas gift from my mom last year.


I made the pattern called "Light and Airy Afghan".


I really like how it turned out. It has lots of detail and matches with the red and orange colors of our living room. 


The edging on the afghan was really fun.


This turned out to be a pretty good-sized afghan, the finished size was 47" x 65". The perfect size to cuddle up on the couch with.


I'll end with a close-up of the stitches. It was a fun and easy project!