Monday, October 3, 2011

Time-Out Cowl

I finally finished my cowl for the crochet along featured on Maybe Matilda. I had the length finished for awhile, but today finally sewed it together into a loop. I made a few adjustments to the pattern. Instead of making it a straight loop, I created a twist so it would lie nicely crossed on my neck. I also didn't do the full 52 inches. I really wanted to keep going since I had more yarn and was really enjoying crocheting, but it would have been too long, and I never would have worn it.

Here's how it turned out. I LOVE the yarn color. I really liked how the different colors went together so nicely and gave it a patterned look.

Man, I hate taking pictures of myself. Oh well, these are the best I could do by myself with a camera and the bathroom mirror.


Showing off my 21 week baby bump :)

I actually love it!! I wasn't too excited about the prospect of a cowl (whenever I told people I was making one, I had to explain it, I actually didn't know what it was myself). But I like how it's a loop, so you can wear it pretty much like a scarf but don't have to worry about the pesky ends getting caught in things... i.e. your jacket zipper, the door, your kid :) Excited to wear this once it gets to be scarf (or cowl) season.

Tuesday, September 13, 2011

Nursing Cover-Up

The first sewing (or any type of craft) project that I've worked on in a long time. I know I have some time before the baby is born, but I thought it would be a fun and easy project to get out of the way.

I've made a few of these now, this is actually my fourth one, I made two for myself (one that was made from flannel that I discovered was way too hot for a warm baby, and one that I loved but that was starting to fall apart after repeated washings) and one for a friend. I have to say, this is the best one I've made so far!!

I've used this pattern every time, I got it from Craft Warehouse a couple years ago. It's a very easy pattern to follow and makes a perfect sized cover-up.


I love the fabric I found at Joann's to make it. That's always my favorite part about sewing projects... picking out the fabric.


This time around I improved on a couple of things. The pattern calls for using D rings for the strap, which I always found a little annoying. After making my friend one and looking at her store-bought one, this time around I used overall snaps for the strap instead of the D rings. So much quicker to snap and unsnap, and you can also leave it adjusted to the length you want for the next use instead of having to loosen it up every time you took it off.


The top of the cover-up has boning sewn in along the edge to help it poke out so you can see the baby while nursing. The two I had made previously for myself didn't really have this feature operating correctly. After studying my friend's store bought one I realized how it was really supposed to go. So I made a few adjustments in how and where the straps were attached, and this time I actually get to use it how it was meant to be used!

The bottom edge of the cover-up has flannel pockets sewn along the edge which I found very useful for storing nursing pads.


Can't believe I'm having another baby and will be using this soon! 

Thursday, September 8, 2011

A new project!!

Okay dad... this one's for YOU!!

Since I found out I was pregnant (4 months ago now), I haven't been doing much crafting-wise. Chalk that up to feeling exhausted and nauseous all day long. But now that I'm going into my fifth month, things are going better. I actually made something the other day (I'll make a post on it soon) and just decided today that I'm going to participate in the crochet-along from Maybe Matilda (a fun and quirky blog I follow). She's going to go through step-by-step instructions on how to crochet a pattern, then once you're done, you get a free pattern from her etsy store, and if it's really good and others vote on your project, you win some other cool patterns. So, here we go with crocheting!! I've knitted before (only able to make scarfs though, or hats and blankets on the knifty knitter... hmmm... maybe I can create some posts about those projects) but have never really been able to read patterns. The crochet-along is supposed to teach you how to do that.  

So here's the button/link to her site.

This is what we are making.


The project I voted on didn't win, but oh well, all the projects were free patterns online, so if I figure out how to read patterns, hopefully I can make the one I wanted to make anyway!!

Sunday, June 19, 2011

A Little Dye Project

I bought some fabric dye the other day in order to fix a couple jackets I have that I don't wear.

This jacket I've had for a long time, I got it at Shopko originally (I miss Shopko), but white is just not a practical color with a toddler.


It also had a few stains on it (duh, it's white).


This jacket I got at the Goodwill awhile back, and really liked the fit, but never really wore it. I realized why the other day. Oatmeal khaki does not look good next to my face, it totally washes me out.


I picked up some Rit fabric dye in dark brown.

After following the directions, this is how they turned out.

The khaki jacket turned out great. This is the jacket I originally bought the fabric dye for, so I was glad it turned out well. It didn't really turn dark brown though, maybe I didn't leave it in the dye long enough. It turned out more of a mahogany color.


A view of the back. I love how the stitching turned out, making it sort of a contrasting look.


The originally white jacket didn't turn out as well. It was kind of an afterthought, I decided to throw it into the dye since I had some dye left over. I didn't completely wet it which might have been part of the problem.

There were a few weird colored spots on it, maybe the dye wasn't mixed well enough.


It also did not turn dark brown, which is weird since it should have been more brown than the other one since it was originally white and not khaki. But it turned out more of a dusty rose color. It's pretty, just not dark brown. Oh well.

Wednesday, June 1, 2011

Alterations on a Cardigan

I got this cardigan for free from a friend (thanks Marella!!). I loved the detailing on the sleeves, and the color, but hadn't worn it yet because it just didn't fit right.

Too baggy, not flattering.

See the beautiful sleeves?

I started by cutting off the ribbed material across the bottom.


Then I pinned down both sides and sewed about a half inch inside the previous stitches. Just enough to make it more fitted.


So for the hemming on the bottom... yeah that wasn't fun. I tried it first by just pinning and sewing, but that ended up making it all wonky (yes, wonky). A half hour later, after some quality time with my seam ripper, I tried something different.

I found some bias tape that was left over from a previous project. I tucked the now completely frayed edges (taking out stitches on knit is NOT FUN) into the tape, folded it up, then pinned it across the bottom.


I sewed twice around the hem, making sure to catch the knit inside the bias tape all the way around.

After the hassle of hemming, it turned out pretty good!! There were a couple spots around the edges that still looked a little weird, but now it is wearable, instead of something just hanging in my closet.


 I actually have two more cardigans to alter, hopefully I learned my lesson with this one and the next two will go quicker.


Tuesday, May 24, 2011

A new dress (the best one yet!!)

Okay, I think I'm finally starting to get this sewing thing figured out.

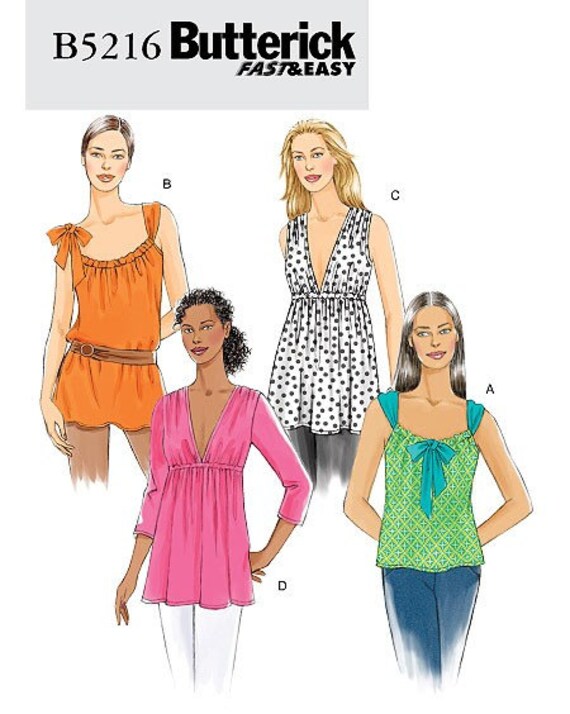
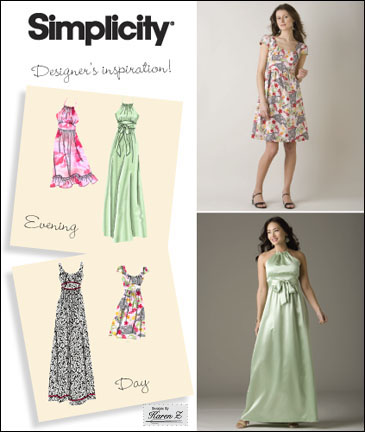
I just finished making a dress from a modification of Butterick 5216, using Simplicity 2579 for the skirt portion.

I made option C, but just lengthened the bottom and made it into an A-line skirt using the skirt portion of the Simplicity pattern. 


The bottom portion of the Butterick pattern had a line across the waistline that said if you wanted to lengthen or shorten the bottom, to cut there. So I did, then placed it on top of the Simplicity pattern.


Here's a closer picture of what it looked liked with the Butterick portion cut in two. I had to fold over the edge of the Simplicity pattern, it was a little too wide.


Once I got the dress made and tried it on, it was a little too gappy in the front (is gappy a word?). Since I didn't want my entire bra hanging out, I decided to close the gap.

I tried on the dress, then pinned where I wanted the top to come together.


I then sewed a gathering stitch up both sides from the pin down, and pulled on the stitches to gather them.


Then I pinned the two sides together, making sure they overlapped.


Then I basted, and stitched, making sure there weren't any gaps left between the two sides.

Once I got the neckline finished, it was perfect!!


 I love the A-line shape of the dress, it's so comfortable to wear. And the silk feels really nice.

 I was a little worried about working with silk again (after the frustrations I had making this skirt), but it wasn't too bad. The hemming around the neck and arms was somewhat frustrating, but all-in-all, it turned out pretty good, and I'm very happy with it. And an added bonus, I got the fabric on clearance at Joann's, 2 yards of 60 inch (instead of the normal 45) for $5!! Now let's hope the weather gets nice enough to be able to wear it in the near future!!

Monday, May 23, 2011

Wrap Dress from Two T-Shirts

Yes, you read the title right.

I went from this...
to this!!!


I followed this tutorial for the main idea, but changed a couple things. I bought two XL navy blue T-Shirts from Walgreens out of their mistake shirt bin. They were only $2 a shirt (yes, that's $4 total for the dress!!).


I used an existing dress I had that fit well to figure out the approximate shape and size of how I wanted the dress to turn out.

I added a waistband and ties to the dress instead of just sewing the top half to the bottom half like the tutorial suggested.


The coolest thing about this tutorial? No hemming!! You get to use the existing hem for the bottom of the dress (as seen above) as well as the sleeves. The tutorial instructed you to hem the neckline, but since t-shirt material doesn't shred when you wash it, and it rolled nicely, I didn't feel I needed to.

I'm pretty happy with how it turned out. I tried it on for my husband and he was impressed ("What? You made that from t-shirts?"). I'm going to embellish it a little, add some fabric flowers to it somehow, but I haven't done it yet. That might be another post :)